HTML & CSS of the lab
In the JavaScript programming portion of this lab, the HTML and CSS is provided. While this provides a handy framework to get started learning the fundamentals of making an interactive website, it overlooks some of the crucial elements of actually constructing and styling a web page. Here we’ll cover some of the items that we used in the JavaScript portion of the lab to more holistically understand what goes into constructing an interactive web page.
HTML
HTML a way of describing the structure and content of a page. For anything to be actually drawn on the screen for a web page, we have to have the appropriate HTML in place.
General Structure
The general structure of an HTML document is as follows:
<!DOCTYPE html>
<html>
<head>
  <!--
    Include "meta" information about the page here and
    link to external resources that will be used
  -->
</head>
<body>
  <!--
    Include actual visible content for the page here
  -->
</body>
</html>
Note that there are three main parts. The <!DOCTYPE html> line declares that
we’ll be using HTML5, which is the latest-and-greatest standard for HTML. The
rest of the page is wrapped in <html> tags (meaning that there is an opening
<html> as well as a closing </html> tag). Within the html element, we have
a <head>...</head> and a <body>...</body> section. We’ll elaborate more on
this structure later as we put it to our use.
HTML DOM
Note how in the previous example we had “tags” (i.e., that which is enclosed
within <...>) that defined “elements” (meaning everything between the opening
<...> and closing </...> tags). In fact, we could nest elements within
each other. Both the head and the body elements are nested within the html
elements.
This nested property of HTML is particularly powerful. As it turns out, every element has a parent–or enclosing–element, and every element can potentially have children elements–elements that it encloses. Using this “tree-like” structure, we were able to use JavaScript to effectively manipulate the contents of the page by inserting, removing, selecting, and querying certain elements on the page.
Because this structure is so universally useful, we have a name to refer to it: the DOM, or Document Object Model. It’s arguably less useful to know what it’s called, though, when compared with knowing how to construct or manipulate it, but it’s still important to understand as a shorthand for discussing these topics.
Throughout the rest of our discussion, we’ll refer to the “DOM”; basically all you need to remember is that when we use this term, we’re referring to an abstract representation of the HTML code that we write. Rather than referring to the actual text in our HTML files, the DOM refers to the structure that we’re instructing the browser to construct. Metaphorically, HTML code is the blueprint, and the DOM is the “virtual” building that gets constructed as a result.
Building Up Content
Now that we understand the general structure and goals of HTML, we can discuss how to actually use it to create web pages. Because there are so many different HTML tags, we’ll use a few examples to illustrate a sampling of what’s possible.
Headers
Just like normal printed documents, HTML has a concept of creating textual
headers. Using the tags <h1>, <h2>, <h3>, <h4>, <h5>, <h6>, we can
create headers in our web page that divide the content up into manageable and
related content.
<h1>Heading - First Level Heading</h1>

<h2>Subheading - Second Level Heading</h>
Paragraphs
The <p> tag lets us include paragraphs of text separated by newlines.
<p>Lorem ipsum dolor sit amet, consectetur
adipiscing elit. Proin eu metus gravida, ornare
erat non, molestie orci. Sed ornare libero quis
orci condimentum dignissim. Vivamus fringilla
felis id lacus lobortis pulvinar. Donec efficitur
eu lacus non pulvinar. Maecenas id eros mattis,
rhoncus mi a, pulvinar mauris.</p>

<p>Maecenas consequat, justo vel placerat
convallis, ligula arcu venenatis dui, ut gravida
ligula lorem sit amet lectus. Donec maximus felis
id faucibus vehicula. Morbi massa eros, mattis non
nulla et, tempor tincidunt leo.</p>
Images
The <img> tag lets you insert an image into a page. The img tag is part of a
set of exceptions to the rule that every element must have an opening and a
closing tag: the img tag instead needs only an opening tag.
<img src="http://upload.wikimedia.org/wikipedia/commons/3/37/Wikipedia-lolcat.jpg">
Note also how we used special attributes (i.e., key="value") to specify the
source of the image. Various tags have different attributes that allow you to
specify extra information to the tag.
Div and Span
Up until now, each tag we’ve seen has had a particular purpose; h1 defines a
heading, img defines an image. There are two general-purpose tags that allow a
wider range of expression: <div> and <span>. These tags don’t carry with
them any semantic meaning like the other tags we’ve seen so far. The best way to
think of them is just as rectangles; a <div> encloses a block of a certain
width and height on the page, and a <span> encloses a certain amount of text
inline.
Because these tags are so abstract, we’ll defer an example until later when we can give a more concrete example. For the impatient, refer back to the JavaScript portion of the lab!
Case Study
Let’s take a look at the HTML from the JavaScript portion of the lab. It’s not typical of an HTML article, but it’s fairly typical for a page that’s meant to be interactive.
<head> Section
Let’s first draw our attention to the head section of the page.
As you can see, there are a bunch of meta. Among other things, meta tags are
used to describe the title, description, and character encoding of a web page.
More importantly, though, are the link tags. Link tags are used to “link in”
external resources to our page. For this particular game, we separated out the
code that deals with the way the page is styled into a couple other pages, which
we can include using this tag. In particular, we link to a file called
normailzie.min.css and a file called style.css.
Remember, everything inside the head section is invisible to the user.
form - Getting Input
In interactive web pages, one of the most important parts is gathering input
from the user. This is done through the use of “forms”, which we can create with
a form tag.
Forms contain inputs that define what kind of data is needed from the user, as
well as buttons that can allow users to interact with our forms.
One thing you’ll notice about the HTML at this point is that there are lots of
attributes at play. Some of the attributes that keep popping up are id="..."
and class="...". These attributes are used to classify, name, and refer to
groups of or individual elements. This is particularly useful when writing CSS
to control the way these elements look as well as JavaScript to control the way
these elements behave when the user interacts with them.
Everything in these lines corresponds to the following snippet when rendered by the browser:

Game Scoreboard
The next section of the code uses tags that we’ve already covered. It uses a
div to wrap around h1 elements, which in turn are used to display some
information about the ongoing game.
When rendered, they look like this:
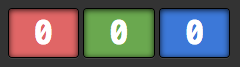
Perhaps this isn’t the best first example of what h1 and div look like when
rendered. Notice that there’s no evidence that the three headings are contained
by a div element. Rather, the div is strictly a container that’s used to group
the elements. We’ll see why this is useful when we get to the CSS portion of the
lab, but for the curious, it has something to do with the special
class="center" attribute that we’ve tacked onto this element.
Meanwhile, the h1 tags just contain the number 0, which is shown in the
output. We’ve done a significant amount of work to get these h1 tags to look
so special. Normally, h1 tags look like the headings do on this page: just
bold text of a larger size.
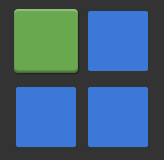
Game Board
What the game board looks like depends on how many tiles the user specifies, which is why the current game board looks so empty in the HTML right now!
This section is dynamically built up in the JavaScript code, as you’ll recall from the lab. As an example though, we can capture what the browser’s notion of the DOM looks like once we’ve added tiles. For a 2 x 2 board, the HTML looks like this initially:
<div class="center">
  <div id="tile-wrapper">
    <div class="tile-row">
      <div class="tile green"></div>
      <div class="tile blue"></div>
    </div>
    <div class="tile-row">
      <div class="tile blue"></div>
      <div class="tile blue"></div>
    </div>
  </div>
</div>
You’ll notice some interesting things about the HTML here. For one, there is no
“text” inside the tags, just other tags. Also, we’ve used div tags exclusively
in this section. The reasoning is that there’s no HTML tag predefined which
encodes a “tile” or a “row of tiles” or a “board of tiles.” Instead, we use
divs, which by themselves have no meaning, to represent these features. Once
we get to the CSS section, you’ll see how we can transform these identity-less
div elements into the tiles you see rendered below:
JavaScript
Finally, you’ll remember from the lab the lines we needed to include the JavaScript code we wrote into our page.
The <script> tag doesn’t actually show something on the screen, even though
it’s in the <body> section. It should probably belong in the <head> for this
reason; however, we’ve included it in the body for a special reason. By
including it here, we’ll ensure that the browser has parsed and rendered
everything above these lines before attempting to download and run our
JavaScript code. This means we can show the user an interface quickly without
them seeing a blank, white page while the real page loads.
CSS
We’ve alluded to CSS throughout the above section, and now we’ll finally get to see it in action. CSS is the way that we control how a page looks, as opposed to what a page contains. Because CSS is a different language from HTML, we separate the code into a different file called a “stylesheet.”
CSS Syntax
The building blocks of CSS are actually quite simple. Every CSS statement
consists of two parts: a query selector which queries the DOM for a particular
element to select, as well as a set of style attributes to set. Here’s an
example which queries the DOM for all <p> elements and sets their text color
to blue:
p {
  color: blue;
}
Query Selectors
The first step in changing the way something looks on a web page is being able to select what you want to style. For this, you have to come up with a piece of code that tells the browser which elements your styles should apply to. As we’ve already seen, to select all elements of a certain tag, you can just use their tag name.
This is where IDs and classes come into play. IDs and classes both provide a way of assigning names to particular elements. Their key difference is that IDs are supposed to be unique (i.e., only one element has a given ID), whereas many elements can all share the same class.
To select all elements with the class center and make their contents centered,
we’d use
.center {
  text-align: center;
}
Note the leading ., which tells the browser that you’re referring to a class.
Similarly, to make the element with the ID reds have a red background, we’d use
#reds {
  background-color: red;
}
There are many more CSS selectors that you can take advantage of, so we’ll leave it to just these for now. As it turns out, just being able to use these selectors will get you a long way to designing a well-styled web page.
Styles
Once you’re able to actually select which elements to style, you need to apply a set of styles to those elements. We’ve already seen examples of these above, and there are many more to come. One quick note about styles is that you can apply more than one style at a time:
h1 {
  color: #eeeeee;
  background-color: #333333;
}
This sets the foreground color of an element to a shade of white and the background color of them to a dark shade of gray. Note that we’ve specified the colors using hexadecimal RGB notation, where each pair of digits corresponds to either a red, green, or blue color value. There are many ways of specifying colors in CSS. If you want to use a certain one in particular, check online to see if it’s supported and what syntax to use.
Case Study
To get a deeper understanding for some of the potential of CSS, let’s take a look at how the CSS allows us to change the appearance of the raw HTML we looked at in the previous section.
body
We can apply styles to the body HTML element to have the styles apply to the
entire visible page.
Here, we set the background color to a dark gray add a small 5 pixel padding to the outside of the body. This padding gives us some whitespace between the actual content and the edges of the browser’s window.
.center
Here we see the utility class we used above. Recall from the HTML that we used this class on a couple elements to quickly and re-usably center them on the page.
input
We’ve really added a lot of styles to the text inputs on the page.
border allows us to specify a line border around the edge of the input of a
certain weight and color.
The border-radius property allows us to round the edges of the input according
to a circle with radius 4 pixels. Normally, these inputs would have square
corners.
The 15 pixel padding gives us some space between the border we drew and the
placeholder text.
The font-size property changes the size of the font within the input.
The box-shadow property is really advanced. Basically, it lets you specify a
shadow around an element, the color of the shadow, how large of a blur radius to
apply, how far to offset the shadow from the top left corner of the element, and
whether to display the shadow outside or inside the element itself. When pulled
off effectively, box-shadows can make some really slick-looking designs.
.tile.green:hover
The query selector for the green tiles is particularly interesting.
First, note that we can chain CSS selectors by putting them together without
spaces. .tile.green will select all elements which have both “tile” and
“green” classes.
Next, note the :hover part of the selector. This is what’s called a pseudo
class: classes that are automatically added to elements based on certain
browser events or conditions. This one is added whenever the user hovers over an
element.
Putting it all together, .tile.green:hover selects all green tile elements
that the user currently has their mouse over. It’s used in the code above to
change the background to a lighter shade of green.
Summary
Because there are so many ways to style a particular element, the best way to learn new styles is to find work someone has done to style a particular element on a web page, and then inspect the element, attempting to tinker with or change it’s values to see how the design changes. For this, the Chrome Developer Tools work particularly well.